Task and file & folder commenting
In brief
Commenting on tasks and files & folders allows you to communicate with other people associated with the particular item. If a task or file is in a workflow, other users of the workflow will see also your comments. You can also reply directly to comments, allowing for comment chains concerning specific issues.
Required permissions
Can add comments to their tasks
Can add new file and folder comments
Can view assigned workflow comments (for workflow commenting)
The examples below largely concern commenting on tasks; however, it's exactly the same process for commenting on files.
Viewing comments#
Tasks#
To begin with, please navigate to Tasks. Once there, please find the task you wish to comment on. Note, you can comment on tasks from both the 'List view' and the 'Table view'.
In 'List view', please click the 'Comments' tab. (Also note the current comment count in brackets.)

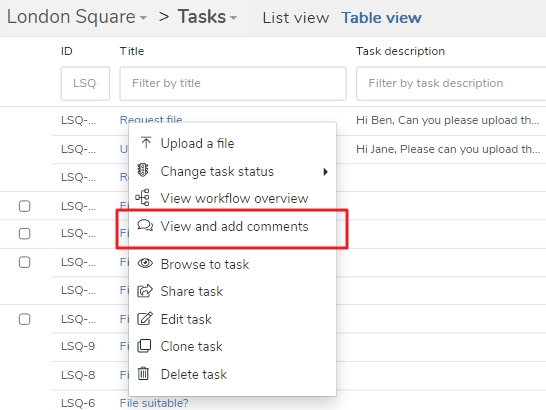
Alternatively, in 'Table view', please click the task name in the 'Title' column, then click 'View and add comments'.
Project Files#
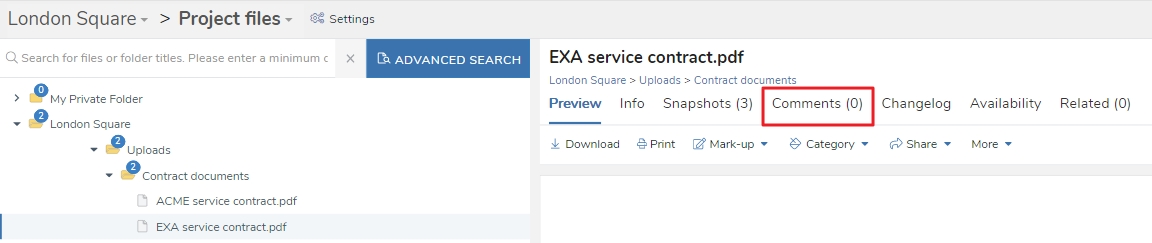
To add a comment to a file or folder, please navigate to Project Files and find the file or folder you wish to comment on. Once you've found it, select it and then click the 'Comments' tab.
Adding a comment#
After the comment tab or window has loaded, you'll notice the white 'Comment' button. If you click that, a text entry panel will show. Within this panel, you'll notice the top row has a variety of actions available to you in which to customise your text - most of which should be instantly recognisable as they're identical to what you'd find in Microsoft Word or similar.
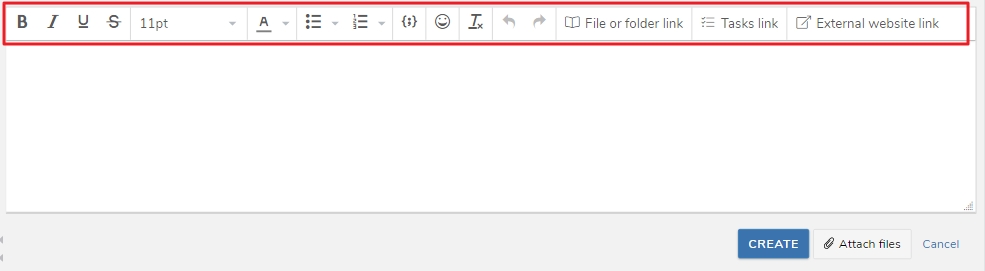
A key difference, however, are the last three items on the list - these are Exaprojects specific features. Note that these may not be available to you depending on your permissions.
- 'File or folder link' - this will let you insert a link to a file or folder into your comment. Using the mini tree-view window, you can select the item to share. Via the 'Link type' option you have two methods in which to share the file or folder:
- 'Project files' - the user will be directed to the 'Project Files' page and view the file or folder there. As any users will need the 'Can view project files' permission, this may not be suitable for every use-case.
- 'Direct download' - a direct download link will be generated. Dependent on how you configure the download, any user may be able to download the item then. Links generated in this manner can be viewed (and disabled or re-enabled) in the Shared files & folders page.
- 'Tasks link' - a link to a task. Note that any users clicking the link will need the 'Can view other users' tasks' permission if they are not an assignee, assigner or watcher of the linked task.
- 'External website link' - a link to a website or Internet resource outside of Exaprojects.
For all the above links, you'll be prompted to give a 'Link title'. This is just the text which will appear in your comment (instead of the raw link itself).
Once you're happy with your comment, click 'Create'. Alternatively, if you've changed your mind, click 'Cancel' to stop adding the comment.
Replying to a comment#
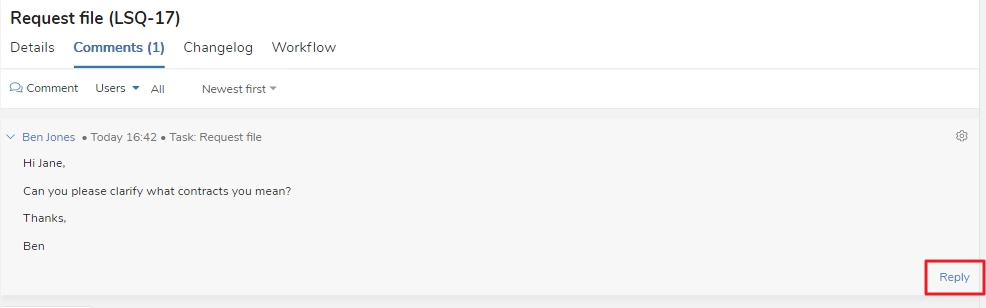
To reply to a comment, simply find the comment you want and then look for the 'Reply' link in the bottom right.
Once clicked, it's the exact same process as adding a comment.
When viewing a comment with comment replies, the replies will be hidden by default. Clicking the 'Show replies' button by 'Reply' will show them. Similarly, click 'Hide replies' to hide them again.
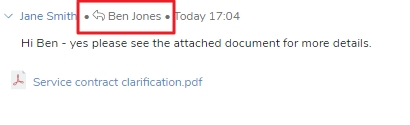
You'll notice that comment replies are slightly indented beneath the parent comment to indicate they are a reply. Furthermore, after the user's name in the reply comment, there's an icon and some text indicating who the user is replying to.
Attaching files to a comment#
As you can see in the above screenshot, there is also the option to 'Attach files'. This will allow you to attach files directly to the comment.
When you click the button, dependent on your permissions, you will be presented with two options:
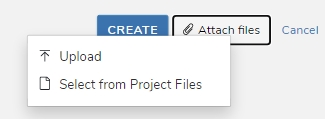
- 'Upload' - this will let you upload a file from your computer onto the comment.
- 'Select from Project Files' - if you have the 'Can view Project Files' permission, you'll be able to select an existing project file to attach directly to the comment.
Once you've created your comment and your attachments have finished uploading, you'll notice the attached files appear as clickable links beneath the comment body. Users can click this link to download the file.

Be aware that any user who has visibility of this comment will be able to download attached files. This includes attached Project Files files by users who do not have Project Files access. If you wish to limit attachments, you may be best using the 'File or folder link' button described above.
Managing comments#
Provided you have the correct permissions, you can edit, share and delete comments by click the cog icon located at the top right of a comment.
![]()
This will then show a menu from which these actions can be performed.
![]()
Using comment filters#
The 'Comment' tab action bar contains a number of filters to help you narrow down the visible comments.
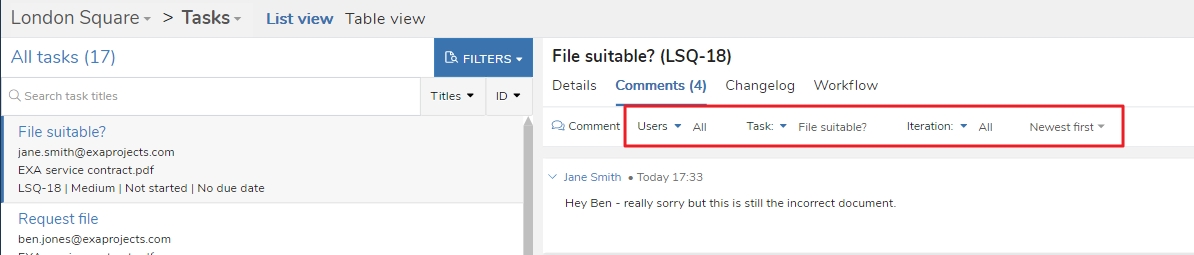
From left to right, they are:
- 'Users' - filter by which users have left comments.
- 'Task' - when the task or file is in a workflow, this lets you filter by which workflow task the comment was left on.
- 'Iteration' - when the task or file is in a workflow, this lets you filter by which iteration of a task a comment was left on. Task iterations are generated when a workflow loops as it results in the same task being generated multiple task.
- 'Newest first' - this lets you reverse the order the comments are displayed in.
Simply click the relevant filter to begin filtering.
Workflow commenting#
Workflow tasks#
If you comment on a task which is in a workflow, other users in the workflow will be able to see your comments. As an example, if you commented on the first task in a workflow, the assignee of the last task would be able to see your comment (provided they had the permission 'Can view all workflow comments').
You can see what task a comment was left on by the information in the comment header:
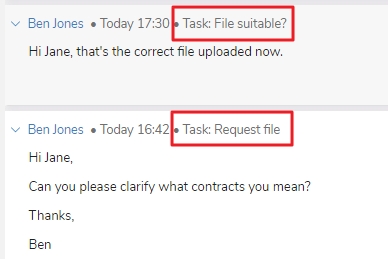
Don't forget you can also use the comment filters to view only comments left on a certain task.
Workflow files#
If you comment on a file that's in a workflow, you will recieve the following prompt:
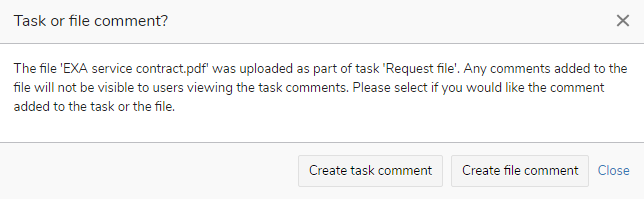
As explained in the prompt, because you are commenting on the file, your comment will be separate from the workflow and its tasks. As a result, it's possible that some of the workflow users don't have the correct permissions to view file comments and will be unaware of your comment. To that end, this prompt is to check that you do want the comment to be left on the file. This may be the desired course of action if you only want users with access to Project Files to see the comment. Generally speaking, however, if the file is in a workflow and your comment concerns the workflow, you should click the 'Create task comment' button.