Adding a file to a workflow
In brief
Adding a file to a workflow lets you manually place a file and any of its linked files into a new workflow. If you want to add a file to an existing workflow, you need to link the new file with the file that's already in the workflow.
Required permissions
Can place files into new workflows
Add single file#
To add a file to a workflow, you'll first need to navigate to Project Files. Once there, find the file you wish to add to a workflow. Then, right click the file, hover over 'Change properties' and then click 'Add file to workflow'.
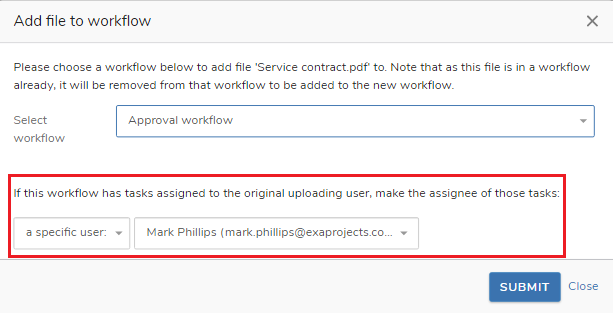
You'll then be presented with a window in which you can choose the desired workflow. If you click the 'Select workflow' search box, you'll be shown any workflows you've recently selected. You can also type in this box to search for other workflows within the project. If you want to view the workflow diagram to make sure it's the correct one, just click the view button.
The final section of the window allows you to make an important customisation to workflows that have been created using the 'assign to original uploading user' feature. There may be situations where you want to override this behaviour and specify a particular user. For example, you want to place a file in a workflow that you uploaded as it was emailed to you rather than uploaded to the system by the file's creator. In that instance, you could specify the file's creator by selecting 'a specific user' and then choosing that user in the subsequent user search box. As a result, even though Exaprojects thinks you are 'the original uploading user', specifying the actual file's creator here will override that and ensure the file's creator is assigned any tasks that ordinarily would been assigned to 'the original uploading user'.
In most situations, however, leaving this as the default 'the user who first uploaded the file' will be the best course of action.
Once you've selected your workflow, click 'Submit'. The file will then be added to the workflow and you'll notice the workflow icon will appear by the filename in the file-tree view. If you click the file, the 'Workflow' tab will also be present, where you can view the workflow's progress.
Multi add files#
Adding files to a workflow is also available as a multi action. This will add all selected files to new workflows. To be clear, each file (and its linked files) will be added to its own, unique workflow - it won't add every selected file to the same workflow.
To multi add files to a workflow, enter multi-mode via right clicking the file and clicking 'Select multiple'. Next check the files you wish to add, then click right click again and select 'Add files from workflow'. The steps will then be the same as described above.
Mass add files#
Lastly, this feature is available as a mass action as well. If you right click a folder, then hover over 'Update all children' and click 'Add all files to workflow', this will recursively add all files in the folder (including those nested in subfolders) to the workflow you specify.
Good to know
Linked files are automatically placed into the same workflow. Be sure to link any files you wish to pass through the same workflow. If you have linked files you want to place into separate workflows, you will need to unlink them first.
Add a file to an existing workflow#
There may be a situation where a file has entered a workflow, but its missing an important accompanying file. For example, a .pdf file was added to a workflow, but the .docx version of it wasn't added. In this case, you can add the additional file to the existing workflow by linking it to the existing file in the Project Files page. The new file will then enter the workflow at the same place as the existing file.